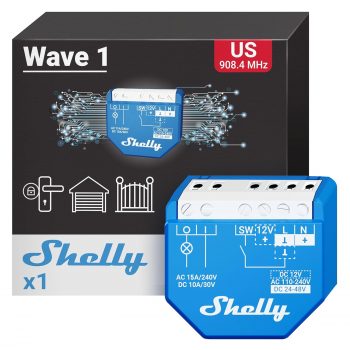

In today’s world, home automation is not just a luxury, it’s becoming an essential part of modern living. The Shelly Wave 1 US UL 1-Channel Z-Wave Smart Switch Relay offers a convenient way to control your appliances and lights remotely, making your home smarter and more efficient. Let’s dive into its features and benefits.
Product Features
| Feature | Detail |
|---|---|
| Product Name | Shelly Wave 1 US UL |
| Type | Z-Wave Smart Switch Relay |
| Channels | 1-Channel |
| Maximum Current | 15A |
| Power Consumption | Low |
| Gateway Support | Compatible with any Z-Wave gateway |
| Mobile App | Shelly Smart Control App (iOS & Android) |
| Key Features | Automate lights, schedule scenes, manual control available |
| Warranty | 3 Years |
Product Overview
| Pros |
|---|
| Easy installation behind existing switches |
| Compatible with a wide range of Z-Wave devices |
| Robust mobile app for seamless control |
| Low power consumption enhances energy efficiency |
| Three-year warranty for peace of mind |
| Cons |
|---|
| Requires a compatible Z-Wave gateway |
| Dry contact may require additional wiring for some setups |
| Limited customer reviews may raise concerns |
| Initial setup can be complex for non-tech-savvy users |
Understanding the Shelly Wave 1 US UL
Installing the Shelly Wave 1 US UL is an essential step in bringing your smart home to life. To begin, I recommend ensuring you have all the necessary tools: a screwdriver, wire stripper, and a voltage tester for safety. Start by turning off the power at the circuit breaker to avo>oid any unexpected shocks.
Next, you’ll unscrew your existing light switch to expose the wiring. The beauty of the Shelly Wave 1 US UL is its compactness, allowing it to fit behind traditional switches effortlessly. Connect the wires according to the wiring diagram provided in the manual. Typically, you’ll be linking the live wire, neutral wire, and load wire. Make sure to double-check your connections, as solid contacts are key to a reliable setup.
After securing everything in place and replacing the switch cover, it’s time to turn the power back on. Open your Z-Wave hub application and follow the instructions to add the Shelly Wave 1 US UL as a new device. This usually involves putting the switch into pairing mode by pressing its button.
When connected, the Shelly Smart Control App comes into play. It’s intuitive and allows me to automate tasks seamlessly—like scheduling lights to turn on when I return home. However, if you encounter issues, such as the device failing to connect, ensure that it’s within range of your Z-Wave hub and not obstructed by walls or appliances. Need assistance? Restarting the device or the hub can often resolve connectivity hiccups. By following these steps, I’ve found that installing the Shelly Wave 1 US UL becomes an empowering part of enhancing my home automation system.
Installing and Configuring the Shelly Wave 1 US UL
When installing the Shelly Wave 1 US UL, the process is relatively straightforward, yet it requires attention to detail. First, ensure you turn off the power to the circuit at the breaker box. Safety is paramount! Next, remove the existing switch cover and detach the switch from the wall box. You’ll find wires attached—note their connections, as you’ll parallel them with the Shelly device later.
Now, connect the Shelly Wave 1 US UL. Using wire nuts, connect line wires to the corresponding terminals on the relay—typically labeled as L for line and N for neutral. If you’re placing the relay behind existing switches, make sure there’s enough space available in the box. Secure everything neatly to avoid any potential short circuits. Once connected, gently place the relay into the box and attach the switch cover again.
After ensuring that everything is properly secured, turn the power back on. At this point, I recommend linking it to your Z-Wave hub. Open your hub’s app, initiate the inclusion mode, and then press the button on the Shelly device. You should see it appear on your hub.
Now, download the Shelly Smart Control App. This app offers powerful automation features. From there, you can set up custom schedules, create scenes, and manage rules for your devices. Suppose you encounter issues with connectivity or functionality. In that case, it often helps to reboot the hub and the Shelly device or double-check your wiring connections. If the relay is not responding, ensure it is still within the range of your Z-Wave network. Following these steps will help you unlock the full potential of the Shelly Wave 1 US UL in your smart home.
Conclusions
The Shelly Wave 1 US UL offers a compelling solution for anyone looking to enhance their home automation experience. With its compatibility, low power consumption, and easy control via a smartphone app, it stands out as a smart switch relay. However, potential buyers should consider the need for a compatible gateway and the initial setup process.