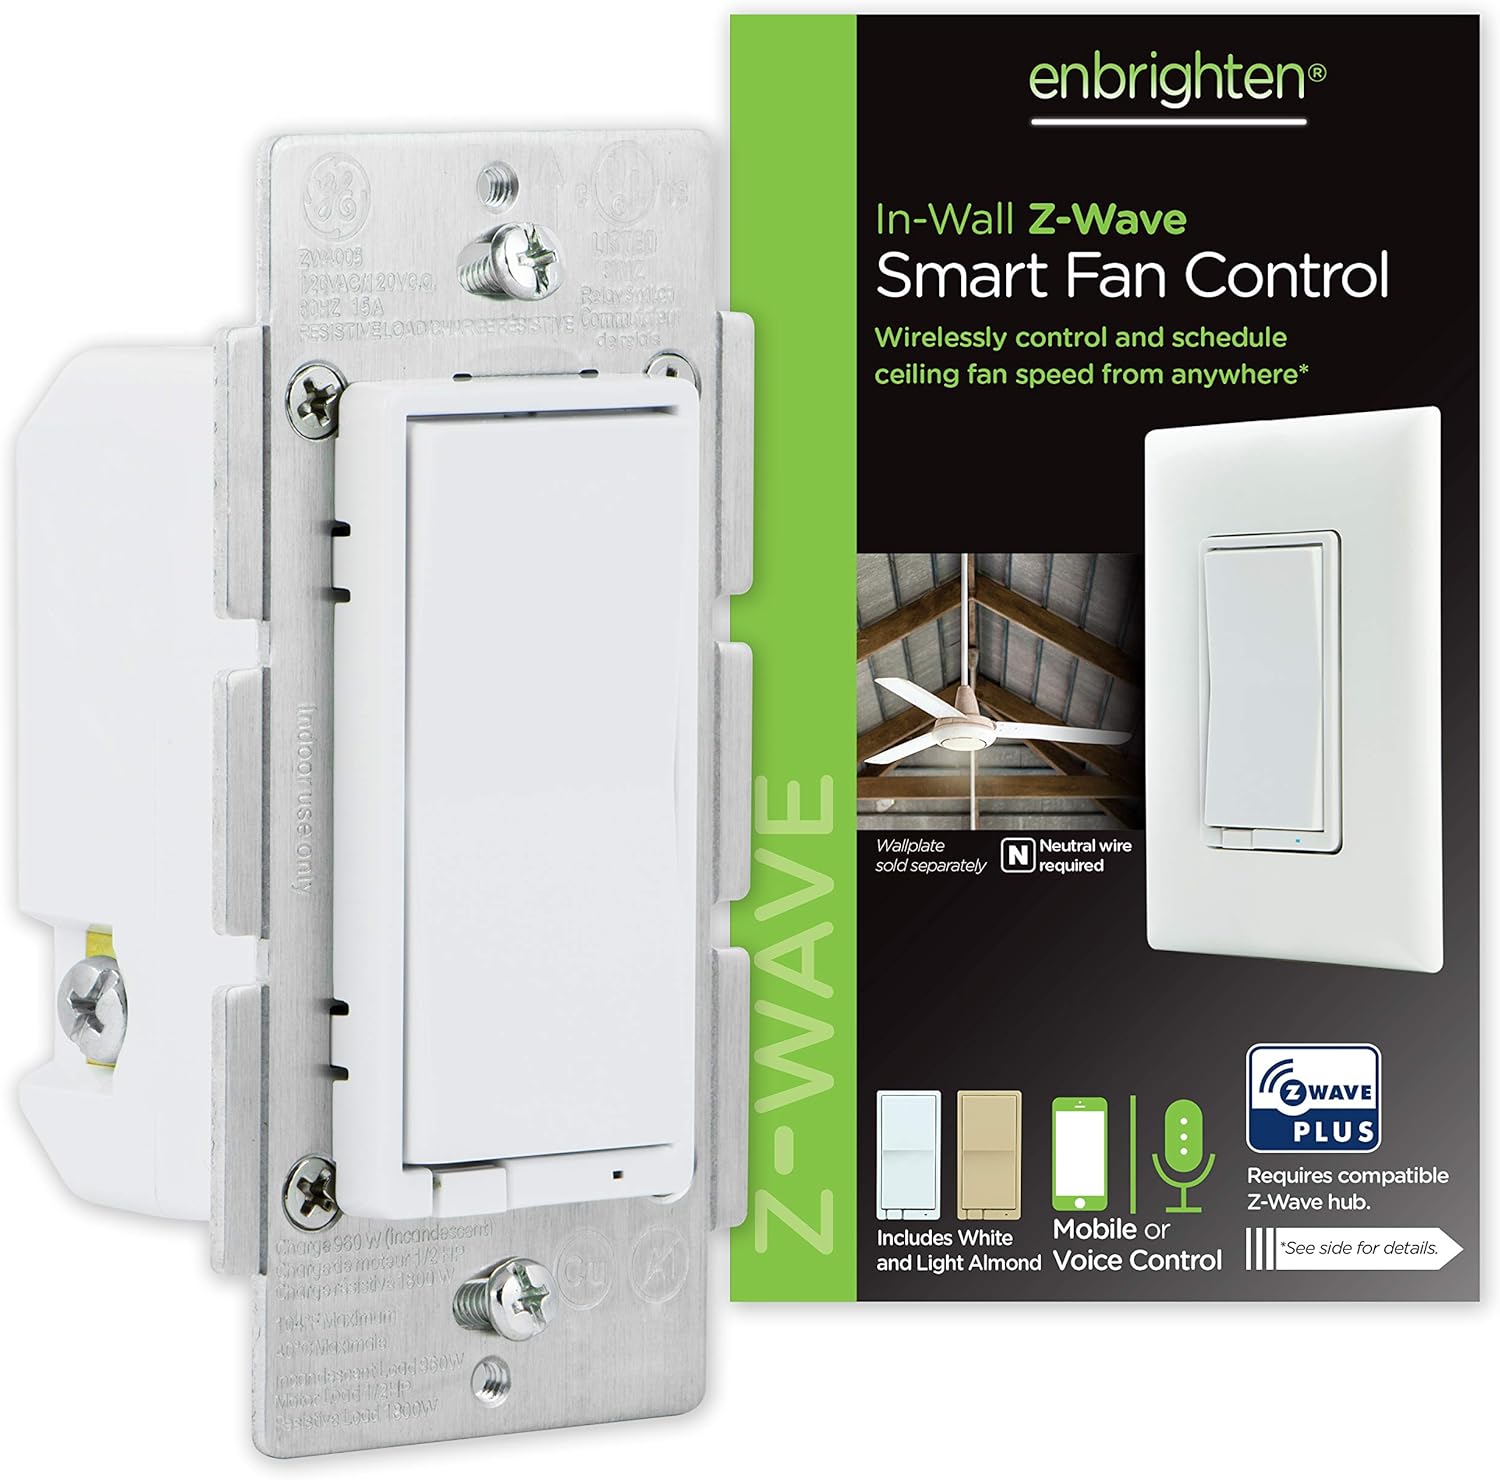
In today’s smart homes, controlling ceiling fans has never been easier with devices like the Enbrighten Z-Wave Plus Fan Control. This innovative product not only simplifies how we manage our fans but also elevates our overall home automation experience. Let’s dive deeper into its features and discover how it can transform your living space.
Product Features
| Feature | Description |
|---|---|
| Switch Upgrade | Easily replace any standard in-wall switch to remotely turn on or off and adjust fan speeds – high, medium, and low settings. |
| Multiple Fans | Wirelessly control and schedule up to two fans from the same in-wall switch. |
| Dedicated Device | Designed specifically to operate fan speeds; separate control for fan lights using an additional Enbrighten Z-Wave switch or dimmer is possible. |
| Range Extender | Extends Z-Wave signal from your hub or other device up to 150ft, enhancing home automation coverage. |
| Changeable Paddles | Includes white and light almond paddles, with additional colors available for customization. |
Product Overview
| Pros |
|---|
| Easy installation and setup |
| Reliable and consistent performance |
| Ability to control two fans |
| Extends Z-Wave range for better automation |
| Customizable aesthetic with changeable paddles |
| Cons |
|---|
| Requires a Z-Wave hub for operation |
| Cannot control lights on fans without additional equipment |
| Limited to specific fan wiring configurations |
Understanding Smart Fan Controls
Integrating Enbrighten Z-Wave Plus Fan Control into your smart home system is a straightforward yet rewarding process. To start, it’s crucial to ensure compatibility with your existing ceiling fan. Most fans work beautifully with the Z-Wave technology, but I recommend checking your fan’s specifications first.
Once you’re ready, you’ll need to turn off the power at the circuit breaker to safely install the fan control switch. As I connect the wires, I prefer to follow the color coding: typically, black corresponds to the power supply, white is for neutral, and green or bare is for ground. It’s essential to position the smart switch in your wall’s switch box, ensuring that it fits snugly without any exposed wires.
Next, you’ll want to pair the Enbrighten device with your Z-Wave hub. Simply put the hub into inclusion mode—a feature found in most home automation systems. After this, press the inclusion button on your Enbrighten switch. You’ll know they’re paired when the LED indicator on the switch lights up.
For optimal performance, adjust the settings within your hub interface. This will allow you to control fan speeds, set schedules, or even enable automation scenarios. If you encounter any issues, don’t hesitate to revisit the wiring or check the hub’s compatibility settings. With the Enbrighten Z-Wave Plus Fan Control set up properly, you’ll elevate your home’s functionality and enjoy a more efficient ceiling fan experience.
Setting Up Your Enbrighten Z-Wave Plus Fan Control
Setting up your Enbrighten Z-Wave Plus Fan Control is a straightforward process that can significantly enhance your home automation experience. First, ensure you have the necessary tools, including a screwdriver, wire strippers, and electrical tape. Before diving into installation, it’s crucial to turn off the power at your circuit breaker to avoid any electrical hazards.
Begin by removing your existing fan wall switch. After carefully exposing the wiring, identify the load, line, and ground wires. The Enbrighten device typically requires a direct connection to these wires. If you’re uncertain about your wiring setup, refer to the user manual for detailed diagrams and compatibility checks with your existing fan. Once you’ve confirmed compatibility, connect the appropriate wires as per the manufacturer’s instructions—red to load, black to line, and green or bare to ground. Secure each connection with wire nuts and wrap them with electrical tape for safety.
After installation, it’s time to connect your fan control to a Z-Wave hub. This involves pairing the device through the hub’s interface. I found that following the step-by-step instructions in the app ensures a smooth connection. Once connected, customize the settings to optimize performance—like adjusting speed settings or setting up automated schedules for your fan.
While enjoying your device, remember that troubleshooting is part of the process. If you encounter connectivity issues, check the distance from your hub, as Z-Wave networks rely on a strong signal. Also, make sure your firmware is updated for seamless operations. When everything is functioning well, you’ll appreciate how effortlessly your ceiling fan integrates into your smart home setup, providing convenience and enhanced control at your fingertips.
Conclusions
The Enbrighten Z-Wave Plus Fan Control is a powerful addition to any smart home, providing effortless control over ceiling fans while enhancing overall automation. Its ease of installation, reliable performance, and customization make it a top choice for those looking to elevate their home. Embrace smart technology and enjoy the comforts it brings.